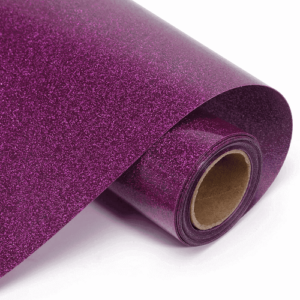
Purple Glitter HTV

Color Purple
Hot Pressing Temperature 130-150℃
Hot Pressing Time 10-15s
Hot Pressing Pressure 0.2-0.5mpa
Customization Accept pattern customization

ygmreflective factory

Purple glitter htv FAQ guide

Table of Contents

Glitter is always found in crafters’ supplies, usually everywhere. You can do the same thing with a heat transfer vinyl crafter (minus the mess). The glitter HTV (heat transfer vinyl) is an essential item. One of these is purple glitter heat transfer vinyl, which is ultra-sparkly, beyond easy to work with, and available in tons of gorgeous colors for any project.

Find out what purple glitter vinyl is all about

Let me begin by telling you a little bit about our glitter heat transfer vinyl. It has a lightly textured surface that reflects light beautifully. It’s such an easy way to make your heat transfer vinyl projects stand out.

You will stand out when you use purple glitter vinyl in your next project. This product is the best for creating your own custom shirts and clothes. With the best vinyl cutters available today, it can be cut easily. Easily cuts with a knife, scissors, and craft punch

In addition, it feels soft when applied, so you won’t experience stiffness when wearing garments with glitter. Unlike other glitter products, ours does not lift, and if you have used glitter before, you know how wonderful this is. As a result, stray flakes will not gather on your body, clothes, craft room, floors, cats, and children

Figure 1 Purple Glitter Heat Transfer Vinyl

Figure 1: Purple Glitter Heat Transfer Vinyl

Instructions for heat press users

Press purple glitter heat transfer vinyl at 130-150℃ for 10-15s. Using our glitter, press all your layers for just a few seconds using the tack down method, and then press again at the end. It is possible to peel purple glitter heat transfer vinyl to cold or warm. It’s always a good idea to let the carrier sheet cool before removing it if you’re working with a lot of layers.

Instructions for home iron users

Set your home iron to the highest setting, typically the cotton setting, if you have one. After that, press your design for 10-15 seconds on a firm surface. Do not use steam or slide your iron from side to side. Remove the carrier sheet after it has cooled, then keep it firmly in place to adhere.

Tips and tricks for applying purple glitter htv

  1. Flip –Once you have selected your design, flip it before cutting. Since you will place it face down on your fabric to iron, if it’s not flipped, your design will be backwards. Once your design is ready, cut it out.
  2. Weed –Your design can be cut by hand or with a craft cutter.  Weeding is the process of removing the excess vinyl around your image/lettering after your design has been cut out. Heat transfer makes weeding easy, but if you’re having trouble, lay your vinyl on a low-heat griddle with the carrier sheet down for a few minutes to help release the adhesive and make weeding lines more visible.
  3. Press –There is a recommended press time, temperature, and pressure setting for every type of heat transfer vinyl, but make sure you do your homework to avoid scorching your adhesive. Using too much heat will cause the vinyl to not adhere properly not to mention you don’t want to damage your fabric.
  4. Peel –Check whether your vinyl can be peeled hot or cold as well. In this case, we are discussing whether the clear carrier sheet can be removed directly after pressing (hot peel) or whether it needs to be cooled and the adhesive set first (cold peel). If you want to avoid losing all your hard work, make sure you check before pulling off that carrier sheet.
Fill out my online form.